author: 小杜的生信筆記
date; 2022.03.21
一、前言
作为一个喜欢捣鼓或是喜欢折腾人来说,这个教程适合你来进行。
作为一个生信小白来说,学习linux系统的操作是一个必要的条件(PS:是必学的一个技能,不管你是高手还是小白中的渣渣)。但是,对于我们很多人来说,开始时候并没有一个linux服务器怎么办?要不就是自己去购买腾讯云、阿里云或是各种云的服务器linux操作系统安装,这是一个明智的选择,这样服务器你可以任何操作,最后把系统搞崩了,那么直接重新安装就可以。
但是,作为一个没有那么资金的同学来说,只能是自己安装一个虚拟机,在虚拟机中安装linux服务器。我最开始就是在这样做的,我根据“Linux兄弟连”的教学视频安装服务器linux操作系统安装,确实看一步安装一步,尽力个千山万水终于安装好。但是很难用,一是只能做基本的操作,二是连网非常麻烦切网速很慢。不得行啊!!!
最终,下巨资购买了腾讯云的服务器,并且我的论文就是用我购买的的服务器中进行分析的。啊哈哈哈哈哈,虽然性能只有那么一点点,但是基础的分析还是可以做的。
但是,我后期看到一个教程,说是Windows中可以安装linux子系统:Windows10安装Linux子系统Ubuntu 20.04LTS,轻松使用生信软件,效率秒杀虚拟机。这是在2020年的时候,我在自己的笔记本电脑中安装了Ubuntn子系统LINUX社区,并且还是进行数据的基本处理,虽然我的电脑配置是高于我的服务器配置,但是速度仍是无法比的,服务器终究是大爷(PS:主要原因,笔记本电脑的CPU过热后就降频,后续的运行跟不上)。
综上所述,在自己电脑(笔记本或是台式电脑)安装linux系统,仅是用于一般的操作即可,做分析,建议还是不要有什么期待,PC终究只是PC而已。但是,作为一个生信狗还是安装一下。你习惯linux的操作或是处理文本的命令,你觉得还是挺方便的。其次,你可以间你安装linux系统中的电脑当做服务器主机进行使用,文件等可以与其他电脑间无缝传输,下载。
-- du
二、Windows系统安装linux子系统
参考教程:Windows10安装Linux子系统Ubuntu 20.04LTS,轻松使用生信软件,效率秒杀虚拟机
具体流程:

添加图片注释,不超过 140 字(可选)
添加图片注释,不超过 140 字(可选)
添加图片注释,不超过 140 字(可选)
添加图片注释linux嵌入式开发,不超过 140 字(可选)
添加图片注释,不超过 140 字(可选)
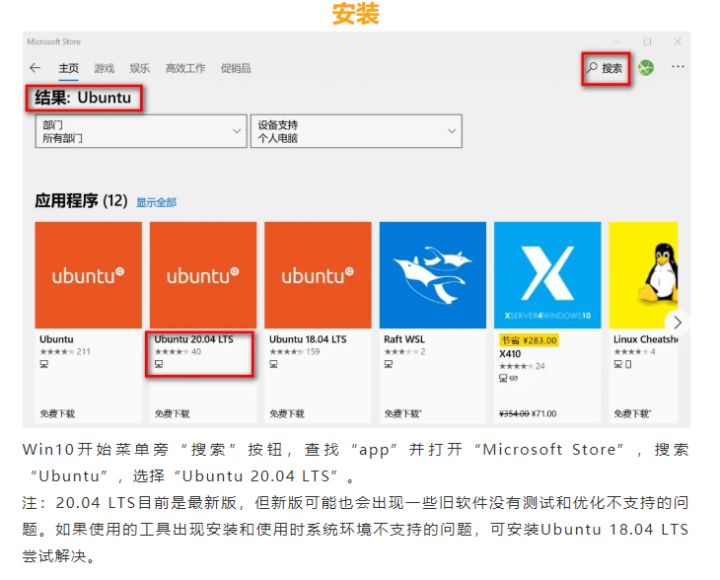
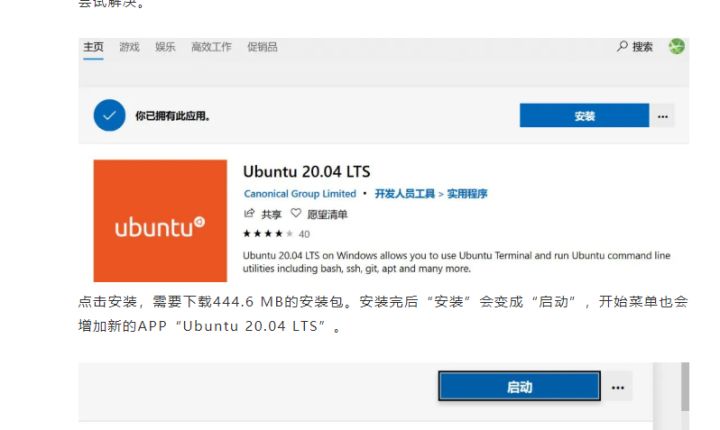
在Microsoft store中搜索Ubuntu即可安装

添加图片注释,不超过 140 字(可选)
添加图片注释,不超过 140 字(可选)
添加图片注释,不超过 140 字(可选)
安装教程操作上面即可,在此不必多讲,上面的教程已经讲述得非常的清楚。如果你还是安装不了,那就购买服务器吧。
三、使用Xshell连接本地Ubuntu系统
系统安装以后,自动挂在C盘,如果你需要进入其他盘,可以使用“cd /mnt/d”or“cd /mnt/e”等。
添加图片注释,不超过 140 字(可选)
大家可以看到我是使用Xshell连接我的linux子系统,原始的Ubuntu界面是非常难用的,因此,我们必须进行改变,使用万能的Xshell进行连接。
OK!下面我们就进行使用Xshell连接的教程哦!还是比较容易的,但是任然会出现很多的问题。
我们的原理也是使用ssh。
3.1 安装ssh
首先,如果觉得使用系统自带的openssh-server无法使用或是不知道有没有的话,我们就是直接重新卸载安装。
## 卸载 原始的 openssh-server
sudo apt-get remove openssh-server
## 安装
sudo apt-get install openssh-server
3.2 安装ssh出现报错
这一步是我安装中出现的问题,导致我一直怀疑是我Ubuntu版本的问题。但是换了两个版本依旧出现这样的问题,我想你也应该可能会出现。
该图来源网络,自己当时未截图
提示说是openssh-server 依赖于 openssh-client 而实际上 openssh-client 已经是最新版本了。进行卸载
但是出现以下的报错情况。
Reading package lists... Done
Building dependency tree
Reading state information... Done
Package 'openssh-server' is not installed, so not removed
Package 'openssh-client' is not installed, so not removed
E: Could not read response to hello message from hook [ ! -f /usr/bin/snap ] || /usr/bin/snap advise-snap --from-apt 2>/dev/null || true: Success
E: Could not read response to hello message from hook [ ! -f /usr/bin/snap ] || /usr/bin/snap advise-snap --from-apt 2>/dev/null || true: Success
WOC!! 不知道怎么办呢,一直卸载就是无法成功!!!!
——)
3.3 解决方法
sudo rm -rf /etc/apt/apt.conf.d/20snapd.conf删除后再进行卸载:
## 再次输入卸载命令
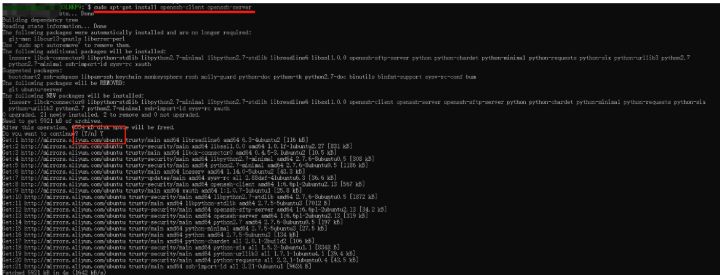
sudo apt-get install openssh-client openssh-server输出:
Reading package lists... Done
Building dependency tree
Reading state information... Done
The following packages were automatically installed and are no longer required:
  git-man libcurl3-gnutls liberror-perl
Use 'sudo apt autoremove' to remove them.
The following additional packages will be installed:
  insserv libck-connector0 libpython-stdlib libpython2.7-minimal libpython2.7-stdlib libreadline6 libssl1.0.0 openssh-sftp-server python python-chardet python-minimal python-requests python-six python-urllib3 python2.7
  python2.7-minimal ssh-import-id sysv-rc xauth

Suggested packages:
  bootchart2 ssh-askpass libpam-ssh keychain monkeysphere rssh molly-guard python-doc python-tk python2.7-doc binutils binfmt-support sysv-rc-conf bum
The following packages will be REMOVED:
  git ubuntu-server
The following NEW packages will be installed:
  insserv libck-connector0 libpython-stdlib libpython2.7-minimal libpython2.7-stdlib libreadline6 libssl1.0.0 openssh-client openssh-server openssh-sftp-server python python-chardet python-minimal python-requests python-six
  python-urllib3 python2.7 python2.7-minimal ssh-import-id sysv-rc xauth
0 upgraded, 21 newly installed, 2 to remove and 0 not upgraded.
Need to get 5921 kB of archives.
After this operation, 6554 kB disk space will be freed.
Do you want to continue? [Y/n] n
Abort.
OK!! 终于卸载成功!!! 花费了很长时间啊!!
再次安装openssh-client openssh-server
sudo apt-get install openssh-client openssh-server安装成功!!!
添加图片注释,不超过 140 字(可选)
3.4 修改配置文件
默认端口是22,但是有可能我们电偶端口相冲突,需要需要修改
// 编辑配置文件
// vim /etc/ssh/sshd_config
    Port 36000  # 默认的是22,但是windows有自己的ssh服务用的也是22端口,修改一下
    UsePrivilegeSeparation no

# To disable tunneled clear text passwords, change to no here!
  PasswordAuthentication yes
  AllowUsers root
配置中有一项PasswordAuthentication, 改为yes可以使用密码登录,使用ssh秘钥对登录,使用no,AllowUsers后面加上你的用户名。
重启ssh服务
sudo service ssh --full-restart成功提示!!!
* Stopping OpenBSD Secure Shell server sshd                                ok
 * Starting OpenBSD Secure Shell server sshd                                ok
有上面的提示,才说明你的ssh已近开启。
4 连接本地Xshell4.1 查看可以用的IP地址
## 输入ifconfig 查看可以用地址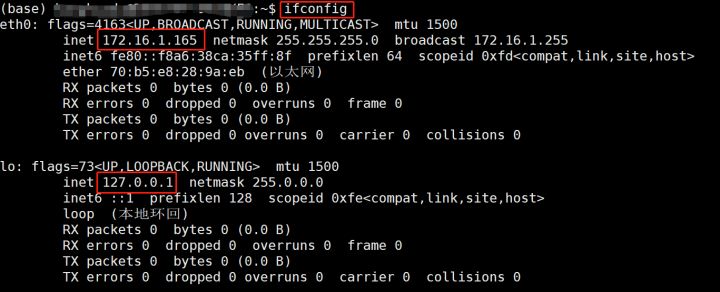
添加图片注释,不超过 140 字(可选)
有两个ip地址
第一个是可以连接网络的ip(172.16.1.165),这个就可以使用远程连接
第二个是本地电脑连接ip(127.0.0.1),这个只能在本电脑本地连接。
###---------------------
链接xshell,常规操作。
添加图片注释,不超过 140 字(可选)
设置完成就可以直接登陆。
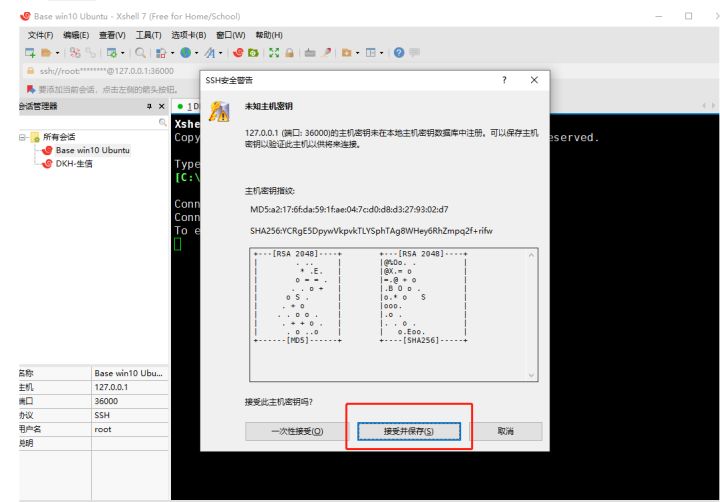
添加图片注释,不超过 140 字(可选)
输入密码,点击确认
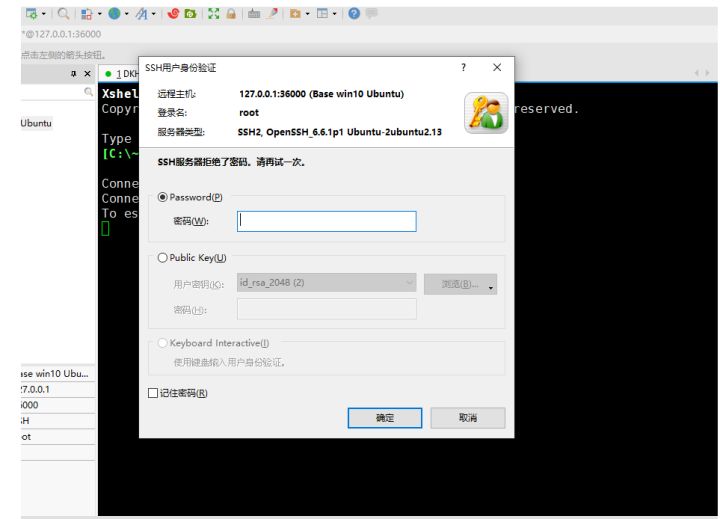
添加图片注释,不超过 140 字(可选)
连接成功!!!
添加图片注释,不超过 140 字(可选)5 设置Ubuntu开机自启
1、创建计划程序
右键我的电脑——管理——系统工具——任务计划程序库
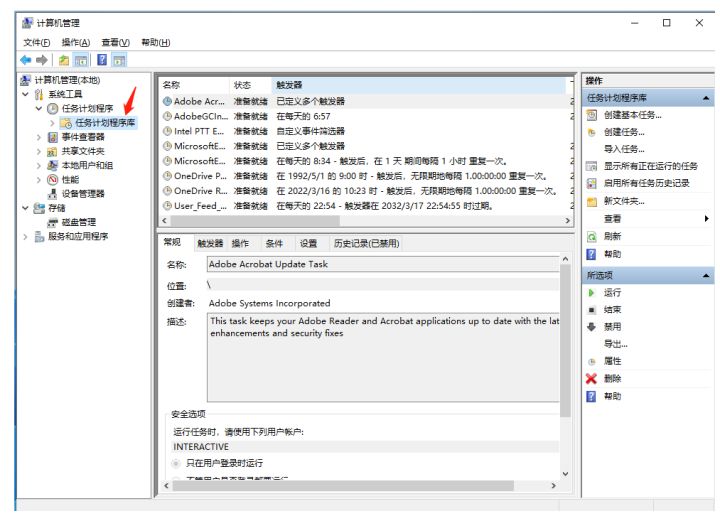
添加图片注释,不超过 140 字(可选)
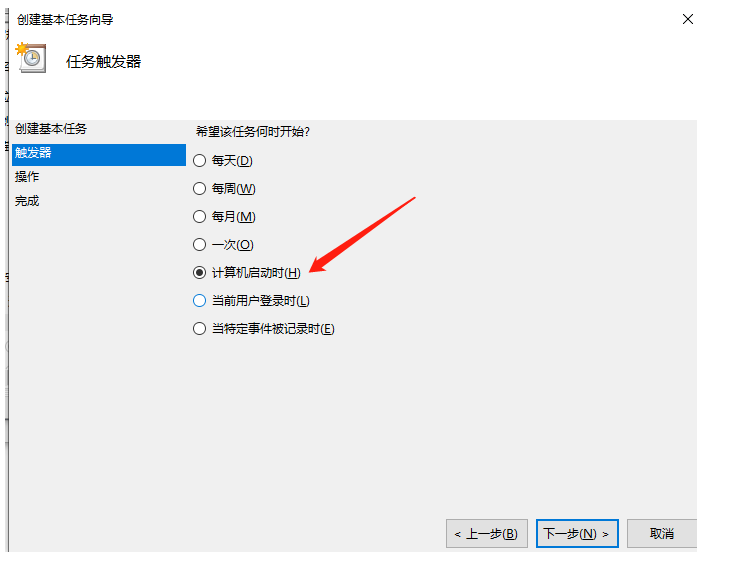
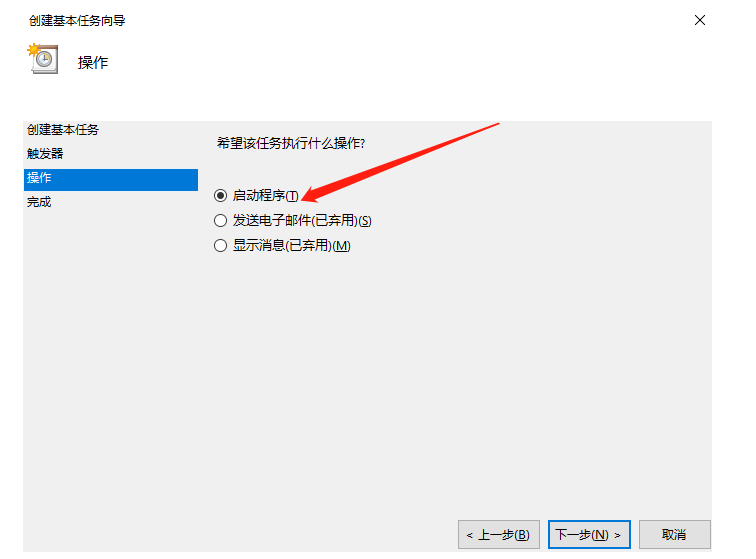
2、点击*创建基本任务*,一直往下进行
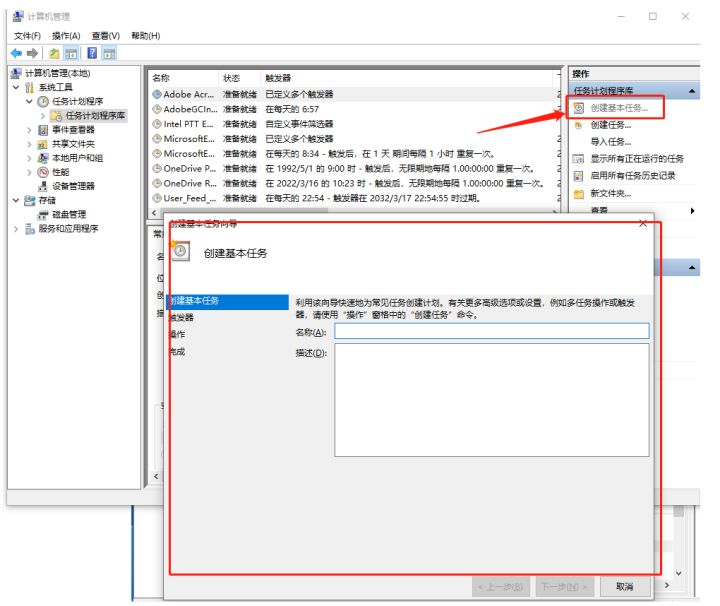
添加图片注释,不超过 140 字(可选)
添加图片注释,不超过 140 字(可选)
添加图片注释,不超过 140 字(可选)
3、进入到C:WindowsSystem32bash.exe目录
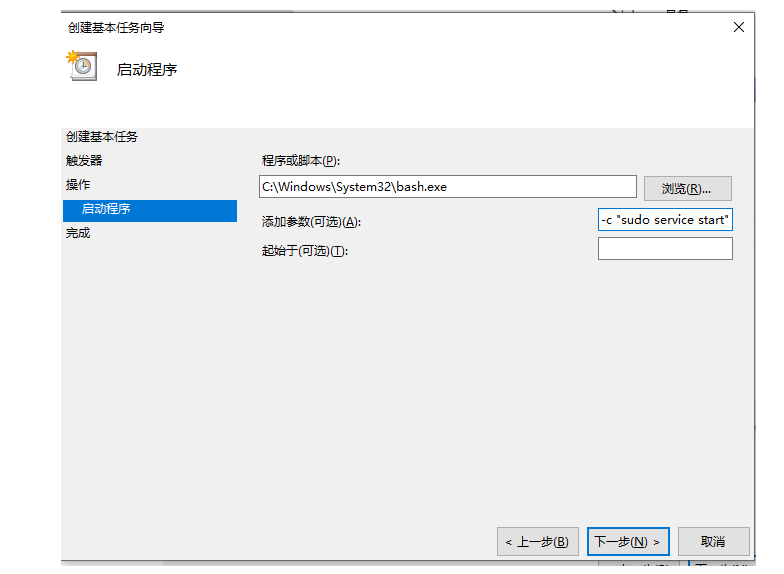
添加图片注释,不超过 140 字(可选)
4、创建成功
5、编辑属性
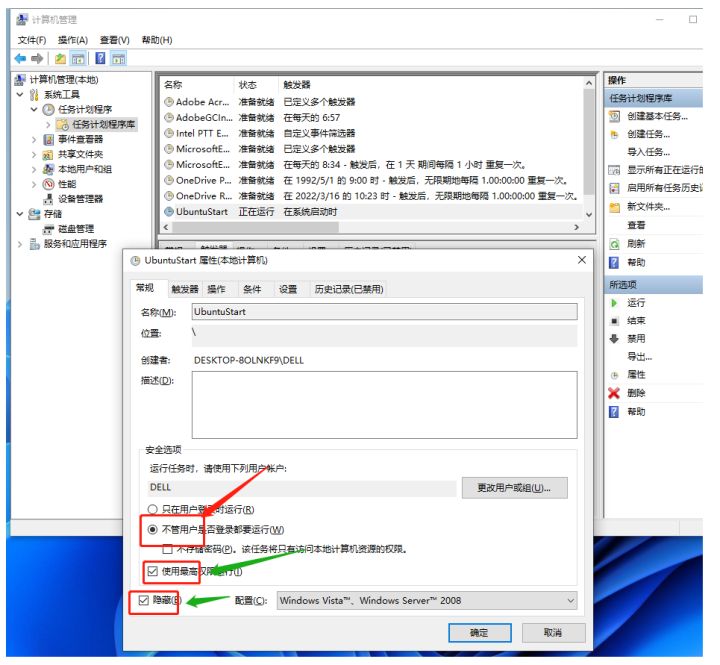
添加图片注释,不超过 140 字(可选)
OK ! 这就设置你的Ubtuntu开机自启的状态。
"小杜的生信筆記"公众号、知乎、简书平台,主要发表或收录生物信息学的教程,以及基于R的分析和可视化(包括数据分析,图形绘制等);分享感兴趣的文献和学习资料!